Over the past few years I have been noticing a problem with students and their ability to dig into a coding or technology problem and explore solutions. That becomes a huge problem if they want to be engineers, programmers or anyone who solves problems at work. I was noticing that more students didn’t have the confidence to “tinker” when it came to learning technology. That is where the Raspberry Pi becomes a solution to this problem.
A good friend reminded me about the Raspberry Pi and how it can be a motivator to spark that curiosity and set them on a path to tinkering, a hallmark trait of all great coders and innovators.
Unlike Indiana Jones digging for artifacts and exploring, I noticed more and more students not being curious. Instead of being like ‘bulls’ exploring aggressively while solving a problem, they would sit arms folded staring. They reminded me of turtles that got flipped on their backs and couldn’t get back on their feet.
I learned that they simply never tried tinkering with things. They never had the chance. Let me guide you along and explain the Raspberry Pi and how you can inspire tinkering.
Raspberry Pi not Raspberry Pie
 Whenever I mentioned Raspberry Pi which sounds like raspberry pie, I get odd looks from anyone who never heard of them or “oh, I love them” from those who have. Let me tell you how I use it to teach (and learn…yes…me) and a free offer for teachers to get the kit I used. There is also a link to the kit I used (Just an FYI, this is an affiliate link of mine but don’t let that stop you)
The internet is filled with resources on using the Raspberry Pi. This is my story of how I introduced it to my students and use it at home. Note, you DO NOT need an electronics or computer science degree to start using these.
Let me help you learn a little more by answering the following questions…
- What is a Raspberry Pi?
- Why learn about the Raspberry Pi?
- Why was the Raspberry Pi created?
- How to develop persistence in your students – Turtle or a bull?
- How to buy a Raspberry Pi
- What to look for in Raspberry Pi kits?
- How a Teacher Can Use a Raspberry Pi
What is a Raspberry Pi?
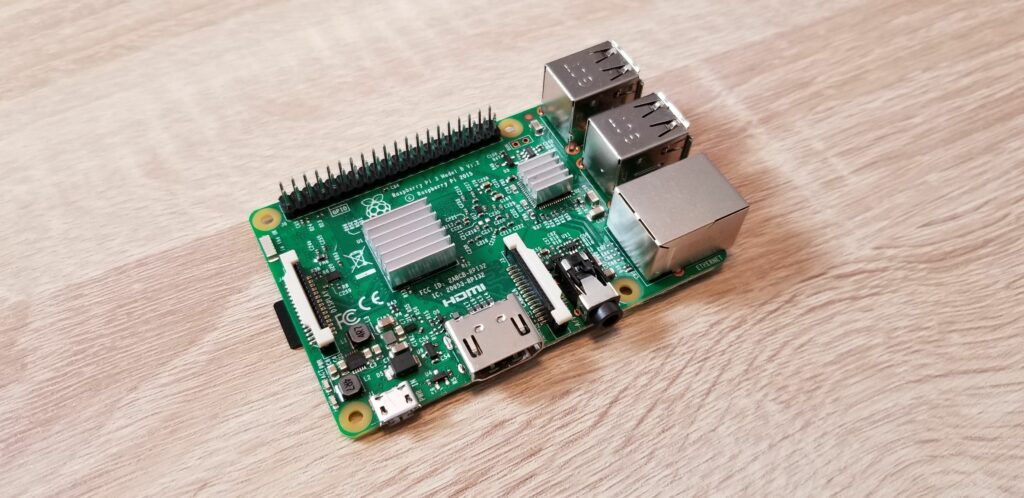
It is a credit card sized circuit board computer that you can plug in a monitor, keyboard, and mouse. It is an incredibly versatile device that provides you with a desktop computer experience that will allow you to surf the web, play games, learn to program and allow you to create and edit documents.
Credit card sized?
Yes. You can throw it in your backpack or a coat pocket and be on your way. You can also embed it in a toy, a model R2D2, on a wall… the list goes on.
Why learn about the Raspberry Pi?
If you are wanting to teach programming, Internet of Things concepts and automation, or break down what a computer really is, then the Raspberry Pi is the perfect device. It also gives you a chance to explore and learn a version of the Linux operating system.

Most computer users today only see the Microsoft Windows operating system or the Apple operating system of the day. Providing an opportunity to learn this operating system can be an a very empowering experience. More on that later.
But let me share my situation as a story and see what you take away from it.
Why was the Raspberry Pi created?
Tinker, tinker, tinker…
The Pi was created to fill a need to ‘tinker’.
Tinkering is what most of us do who work with any form of technology. Those of us who grew up 1980’s built things. We took things apart and put them back together again. Models, puzzles, tree forts, toys, etc..
 Some of us grew up in an era where if you wanted to use a computer you needed to learn specific computer commands and those commands gave you insight to how a computer works.
For the most part, all computing devices work the same but are now masked by easier to use interfaces or a graphical user interface (GUI). It is pronounced “GOO EEE”. It is what we see on our smartphones, tablets, and desktop computers. Point and click or tap type computer interfaces.
We are now in a world where we have convinced a lot of up and coming computer professionals that you just plug it in and it works. I see far too many students who want to be coders expecting to follow steps, by pointing and clicking and then it should just work.
However, if you delve into the coding world with robotics and devices connecting to the internet, you will want to go a little deeper than just point and click.
Most computer users today only see the Microsoft Windows operating system or the Apple operating system of the day. Providing an opportunity to learn this operating system can be an a very empowering experience. More on that later.
But let me share my situation as a story and see what you take away from it.
How to develop persistence in your students - Are you a turtle or a bull?
In my opinion, Pi’s teach persistence.
So I ask the question, are you a turtle or a bull?
Smashing your fingers on a piece of glass as in using a smartphone, does not teach much in terms of computing and STEM. Before you say it….I know there are cool coding apps (I will discuss that in a follow on post) but this approach is much different and in my opinion, much more fun with far more beneficial long term effects on learning.
If you have spent any time with computing devices you know sometimes they just don’t work. So you have a choice. If the code you created or your computing device doesn’t work, do you crawl back in your shell like a turtle and wait for something to happen or do you dig in and charge like a bull to figure it out.
I have seen students do both.
The ones who become great are the bulls. The ones who become turtles well….they need some more coaching and hopefully stay the course.
It isn’t easy to get them to come out of their shells. To help with that I created an exercise called the Lego Chicken Challenge where students have to communicate and collaborate. It helps with the soft skills all employers seek.
I like to thing students want to be bulls but they need to be taught how in this day and age of teaching to the test. Introducing the Raspberry Pi can help with this.
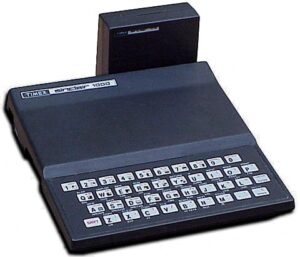
Personally, I like to think I have been a bull all my life because I like figuring out how things work. By the time I was in middle school, I had my own personal computer (Timex Sinclair 1000 with 16 Kilobytes of RAM!) and I was so eager to make it do all the stuff I had seen in the movies especially like in Star Wars or on TV like Battlestar Galactica. Then when the Atari 2600 came along…..I wanted to learn how to make a video game. I digress…
The Pi presents you with a bare bones computer. Yes, it has most of the software ready to go but you have to do some UPDATES and connect a few things to see the MAGIC! Setting it up, running updates with commands you type, connecting cables and testing things out all sharpen thinking skills.
Critical thinking skills get developed along with an interesting confidence. This confidence is a important characteristic to have when creating technology!
If you are wanting to use the Pi as a way to teach how computers operate, they are perfect.
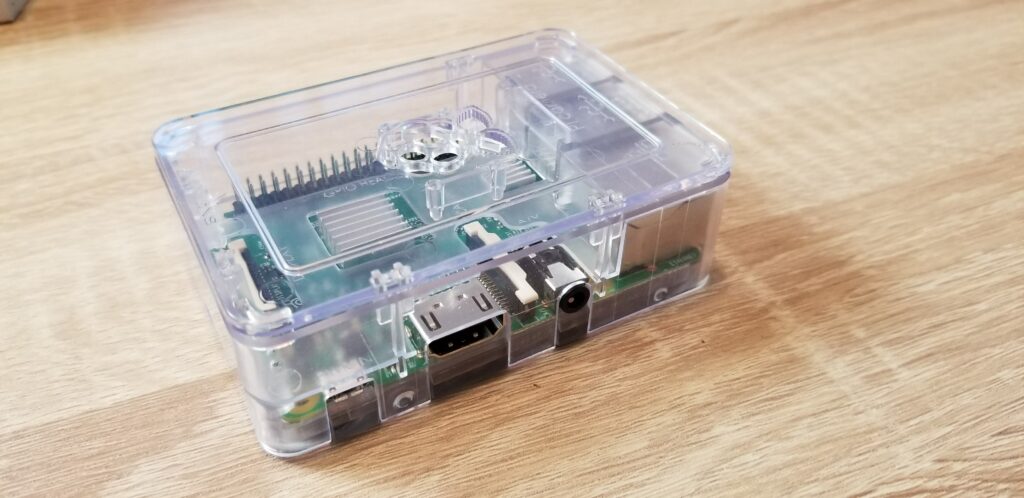
How To Buy a Raspberry Pi
So you are really interested now but what do you need to know when buying a Raspberry Pi?
These are a few items to keep in mind.
My personal recommendation (yes this is an affiliate link to help keeps the lights on) is to purchase a kit but you can strip it down into pieces if you like.
There are many different models and prices available and you can quickly get sidetracked.
As with all technology purchases, you have to answer one question:
“WHAT DO I WANT TO DO WITH IT?”
The model I prefer if you are exploring coding and The Internet of Things (read my explanation of IoT (internet of things)) is the Raspberry Pi 3 Model B (or B+).
Created in 2016, it has built in WiFi, Bluetooth, USB, HDMI, and an ethernet port for networking. The main difference between the B and the B+ is the processing speed (plus a few other advanced features). In my opinion, that speed is not something a new ‘tinkerer’ would notice.
At the time of the post, the Raspberry Pi 3 Model A+ just came out and gave even more speed.
To Buy A Kit or Not To Buy A Kit
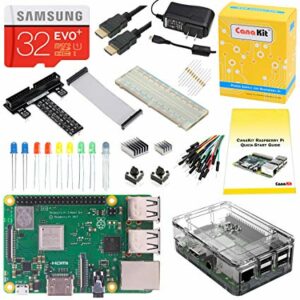 A Raspberry Pi Canakit Kit contains everything you need to get up and running from a power supply to a plastic case to keep your Pi from getting damaged. Some have additional features for those wanting to also explore electronics.
I went with a kit and I show that in my Raspberry Pi unboxing video.
I was very pleased with my Canakit (www.canakit.com) as it contained all the necessary add-ons to get up and running a wide of projects. My unboxing video is the Raspberry PI 3 B Ultimate Starter Kit 32GB Edition.
Also note, you will need the following that are NOT included in the kit.
- A computer monitor or display.
- A USB keyboard and a USB mouse.
I had an extra keyboard and mouse and bought a monitor at a garage sale.
They can be purchased on Amazon.com or directly from www.canakit.com
If you go the route of buying your Pi as individual pieces, be sure you purchase a power supply and a Micro SD card for your operating system.
Setting up your Raspberry Pi is very easy since NOOBS (New Out of Box Software) arrived. NOOBS assists with the installation of the operating system which is a series of programs that helps a computer run.
The operating system you find on most Pi’s is called Raspbian, a variation of an open source operating system called Debian. Debian is built from the kernel (the core programming code) for Linux.
To learn more about free software and Debian go here https://www.debian.org/intro/about
How a Teacher Can Use a Raspberry Pi
If you are teacher whether at home or in the classroom, as with all technology, if you are new to it, take the time to sit and TINKER with the Pi.
You will see that the Canakit comes with a color tutorial that guides you through the setup and also points to video tutorials. Once you are familiar with it follow my download for using the PI in a classroom or at home.
Project 1 - Webserver
If you are looking to explore building a website, then you will want to also have a webserver. I wrote a blog post where I go over how to create a Simple HMTL web page here.
You can go out to GoDaddy.com or a reseller and purchase one for a monthly fee or you can build one for free on your Raspberry Pi. Once you create your webpages, you can copy them over (also known as FTP – File Transfer Protocol) to the webserver.
If you would like the full directions on how to do this click here.
Project 2 - Learn to Code
When you install NOOBS and update Raspbian you will see you have access to coding tools.
You have access to Scratch, Python and Java!
You can learn to code with a version of Scratch that is installed on the Raspberry Pi. This is different than how most learn to use Scratch who run it through their web browser.
I provide a free course to teach you how to program with Scratch.
There is also an environment for learning to program with a language called Python. Python has become very popular in recent years as it is a great language to begin learning how to code.
Also included is a version of a tool for developing software using one of the most widely used programming languages today, JAVA. JAVA is typically taught at the college level although some high school do offer it.
Project 3 - Gaming with the RetroPie
No discussion about the Raspberry Pi would seem complete without saying something about using your pi as a retro gaming console. There are whole websites dedicated to this such as www.retropie.org where they discuss the how-to’s of building your own game system.
Essentially, you can download onto your pi, hundreds of videos created in the 1980’s and 1990’s. The retro pi project assits in installed emulators that will run software created for the Atari, NES, Sega, and a few others.
Visit the homepage for the Retropie for a full detailed explanation https://blog.petrockblock.com/retropie/
Wrapping it up....
The Raspberry Pi is a great experience for any person wanting to ‘tinker’ with a computing device and explore coding. Once you get comfortable with it, you will also learn it is pretty forgiving. So if you make a mistake, no worries….just delete and re-install it. That too is a great learning lesson!
Ultimately though, if you are a parent or a teacher and you would like to have your student go a bit deeper into understanding how things work and allow them to troubleshoot to develop problem solving skills, I highly recommend getting a Raspberry Pi.
Happy tinkering!!

Mr. Fred
Let Me Help You

If you are a teacher or someone looking to help others learn to code, let me help you.





Pingback: The Best Toys To Teach Kids How To Code - Get Me Coding